


In this digital age, Apple Cash has revolutionized the way we handle payments and finances. Apple Cash, a feature of Apple Pay, allows users to send and receive money securely and conveniently using their Apple devices. It serves as a digital wallet, storing funds that can be used for various transactions. With Apple Cash, users can make purchases, send money to friends and family, and even transfer their funds to a bank account.
Apple Cash offers several advantages over traditional payment methods. It eliminates the need for physical cash, reduces reliance on credit or debit cards, and provides a seamless and integrated payment experience within the Apple ecosystem. Users can easily access their Apple Cash balance through their devices, making it a convenient and efficient way to manage funds.
While Apple Cash provides a convenient way to handle day-to-day transactions, there are times when transferring funds to a bank account becomes necessary. Transferring Apple Cash to a bank account offers several benefits and opens up more possibilities for utilizing the funds.
One of the primary reasons to transfer Apple Cash to a bank account is to have access to funds beyond the limitations of the Apple ecosystem. By transferring the funds, users can use them for a wider range of purposes, such as paying bills, making larger purchases, or even saving for future expenses. Transferring Apple Cash to a bank account also provides a sense of security, as funds are protected by the bank’s security measures and federal deposit insurance.
Additionally, transferring Apple Cash to a bank account allows users to take advantage of the various financial services offered by banks, such as earning interest on the deposited funds, applying for loans or credit cards, and tracking expenses through online banking platforms. It provides a bridge between the digital world of Apple Cash and the traditional banking system, offering users more flexibility and control over their finances.
The ability to transfer Apple Cash to a bank account brings a new level of convenience and accessibility to the funds. With the funds in a bank account, users can easily withdraw cash from ATMs, make purchases using their debit card, and conduct online transactions seamlessly. Bank accounts also offer features like mobile banking apps, which provide a user-friendly interface to manage funds, view transactions, and set up automated payments.
Furthermore, having funds in a bank account opens up opportunities for financial planning and management. Users can create budgets, set savings goals, and monitor their expenses more effectively. They can also leverage additional banking services, such as investment options, retirement accounts, and financial advisory services, to grow their wealth and plan for the future.
The convenience and excitement of accessing funds in a bank account make transferring Apple Cash a logical step for users looking to expand their financial capabilities and take advantage of the robust services offered by banks.
Apple Cash Transfer to Bank
Transferring Apple Cash to a bank account is a straightforward process that allows users to access their funds beyond the Apple ecosystem. Apple provides users with options to transfer their Apple Cash balance to a linked bank account, providing more flexibility and convenience in managing their finances.
To initiate the transfer, users need to follow a few simple steps. First, ensure that your Apple Cash balance is sufficient and meets any minimum transfer requirements set by Apple. Then, open the Wallet app on your iPhone or iPad and locate the Apple Cash card. Tap on it to access the card’s details.
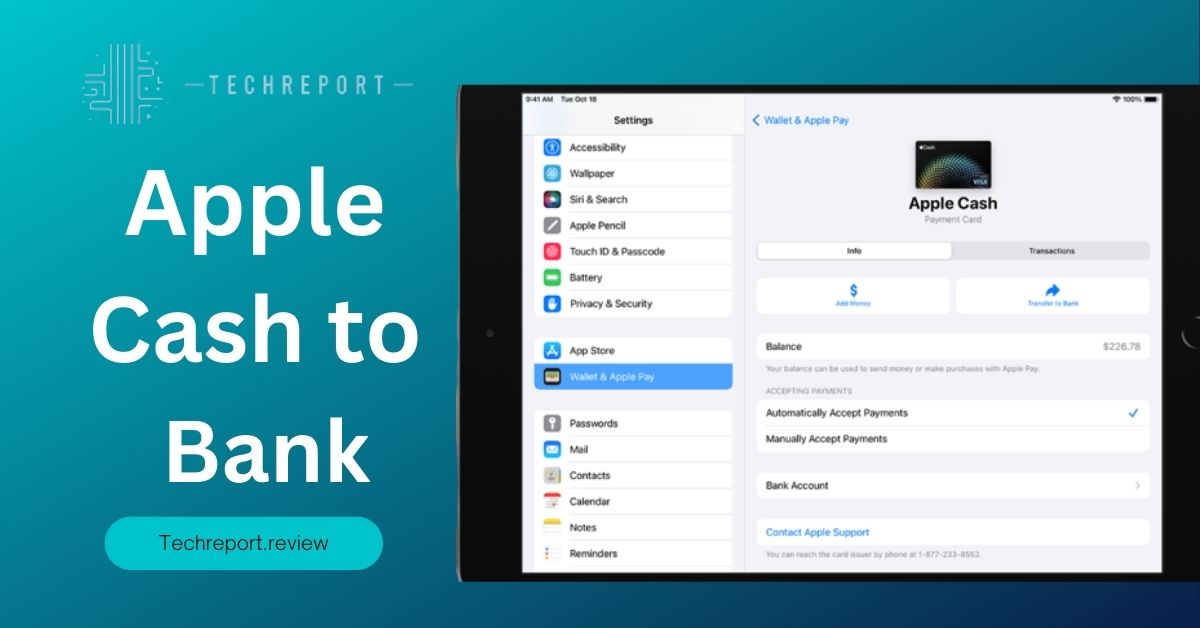
Within the Apple Cash card settings, you will find an option to transfer the funds to your bank account. Tap on “Transfer to Bank” or a similar option, and you will be guided through the transfer process. You may be asked to provide additional information, such as your bank account details, including the account number and routing number.
Once you’ve provided the necessary information, review the transfer details and confirm the transaction. Apple may require you to authenticate the transfer using Face ID, Touch ID, or your device passcode to ensure the security of the transaction. After confirming, the transfer will be initiated, and the funds will be deposited into your bank account.
Apple recognizes the importance of flexibility when it comes to managing finances. Therefore, they offer users various options and features to cater to individual preferences and needs. When transferring Apple Cash to a bank account, users have the freedom to choose the bank account to which they want to transfer the funds.
Apple Cash supports transferring funds to a range of bank accounts, including checking accounts and savings accounts, as long as they are eligible for electronic funds transfers. This flexibility allows users to transfer the funds to their primary bank account or any other account they prefer.
Additionally, users can link multiple bank accounts to their Apple Cash card, providing further convenience and flexibility. This feature is particularly useful for individuals who hold accounts in different banks or want to allocate funds to specific accounts for different purposes. By linking multiple bank accounts, users can easily select the desired account for each transfer, tailoring their financial management to suit their needs.
Steps to Transfer Apple Cash to a Bank Account
Step 1: Verifying your identity and bank account
Before you can transfer your Apple Cash balance to a bank account, it’s important to verify your identity and link your bank account to Apple Cash. This helps ensure the security and legitimacy of the transfer. Follow these steps:
Linking your bank account to Apple Cash
- Open the Wallet app on your iPhone or iPad.
- Locate your Apple Cash card and tap on it to access the card details.
- Look for the option to add or link a bank account and follow the prompts to provide the necessary information, such as your bank account number and routing number. This will establish the connection between your bank account and Apple Cash.
Confirming your identity for security purposes
- Apple may require you to verify your identity before allowing you to transfer funds. This is a security measure to prevent unauthorized access to your Apple Cash account.
- Follow the on-screen instructions to provide the necessary identification information. This may involve verifying your identity using methods such as your Apple ID credentials, two-factor authentication, or answering security questions.
Step 2: Checking eligibility and availability
Before initiating the transfer, it’s important to determine if your bank supports Apple Cash transfers and if the transfer feature is available in your region. Here’s what you need to do:
Determining if your bank supports Apple Cash transfers:
- Check with your bank or financial institution to confirm if they accept electronic fund transfers from Apple Cash.
- Some banks may have specific requirements or limitations for accepting transfers, so it’s advisable to contact them directly or visit their website for more information.
Verifying the availability of the transfer feature in your region:
- Apple Cash transfers to a bank account are currently available for users within the United States. Make sure you are located in a supported region to proceed with the transfer. If you are outside the United States, alternative money transfer services may be more suitable for your needs.
Step 3: Initiating the transfer
Once you have completed the necessary verifications and confirmed the eligibility and availability, you can proceed with initiating the transfer. Follow these steps:
Accessing the Wallet app on your iPhone:
- Unlock your iPhone and navigate to the home screen.
- Locate the Wallet app, which is represented by a wallet icon, and tap to open it.
Navigating to the Apple Cash card and selecting the transfer option:
- Inside the Wallet app, look for your Apple Cash card and tap on it to access the card details.
- Within the card settings or options, you should find an option specifically for transferring funds to your bank account. It may be labeled as “Transfer to Bank” or something similar.
Entering the transfer amount and selecting the linked bank account:
- Follow the prompts to enter the amount you wish to transfer from your Apple Cash balance to your bank account. Ensure that you have sufficient funds available in your Apple Cash account to cover the transfer.
- Next, select the linked bank account to which you want to transfer the funds. If you have multiple linked accounts, choose the desired one for this transfer.
Step 4: Confirming and completing the transfer
After entering the transfer details, it’s time to review and confirm the transaction. Follow these final steps:
Reviewing the transfer details:
- Take a moment to review the transfer amount, the selected bank account, and any applicable fees or transfer limits.
- Double-check that all information is accurate to avoid any potential issues or delays with the transfer.
Authorizing the transfer with Face ID, Touch ID, or passcode:
- To ensure the security of the transfer, Apple may require you to authorize the transaction using Face ID, Touch ID, or your device passcode.
- Follow the on-screen prompts to complete the authorization process, depending on the authentication method available on your device.
Waiting for the transfer to process and receive a confirmation:
- Once you have confirmed the transfer, the transaction will be initiated.
- The time it takes for the funds to appear in your bank account may vary, but typically it can take one to three business days.
- Keep an eye on your bank account for the transfer to be completed, and you may receive a confirmation notification or email from Apple once the transfer is successful.
By following these steps, you can successfully transfer your Apple Cash balance to your linked bank account. Remember to keep track of your funds and maintain the security of your Apple devices and account information throughout the process.
Factors to Consider in Apple Cash to Bank Transfers
When transferring your Apple Cash balance to a bank account, it’s important to be aware of any fees or associated costs that may be involved. Consider the following:
Explaining any fees involved in the transfer process:
- Apple Cash transfers to a bank account are generally free of charge. However, it’s advisable to check with your bank to confirm if they impose any fees for incoming transfers.
- Some banks may have specific policies or charges for electronic fund transfers, especially for large transfer amounts or international transfers.
Discussing fee variations based on transfer amounts and banks:
- Different banks may have varying fee structures for incoming transfers. These fees can depend on factors such as the transfer amount, the type of account, and the specific terms and conditions set by your bank.
- To ensure transparency, review your bank’s fee schedule or contact their customer service to understand any potential charges.
Before initiating an Apple Cash transfer to a bank account, it’s essential to determine if there are any minimum balance requirements. Consider the following:
Understanding if there are any minimum balance requirements for transfers:
- Some banks may impose minimum balance requirements for incoming transfers. This means you need to have a certain amount in your Apple Cash account before you can initiate a transfer to your bank.
- Check with your bank or refer to their terms and conditions to determine if they have any specific minimum balance requirements.
Exploring the impact of minimum balances on transfer eligibility:
- If your Apple Cash balance falls below the minimum required amount, you may not be able to initiate a transfer to your bank account until the balance meets the criteria.
- Ensure you have sufficient funds in your Apple Cash account to meet any minimum balance requirements set by your bank.
Understanding the time it takes to transfer Apple Cash to a bank account is crucial for managing your expectations. Consider the following:
Setting expectations for the time it takes to transfer Apple Cash to a bank:
- Transfers from Apple Cash to a bank account typically take one to three business days to process. However, this can vary depending on factors such as your bank’s processing times and any potential delays in the banking system.
- It’s important to note that weekends, holidays, or unforeseen circumstances may impact the processing time.
Factors influencing transfer speed and potential delays:
- Several factors can affect the speed of the transfer, including the efficiency of the banking system, any intermediary banks involved in the process, and the accuracy of the provided transfer details.
- Keep in mind that international transfers may take longer due to additional verification and clearance processes required for cross-border transactions.
In the process of transferring Apple Cash to a bank account, it’s important to be aware of any restrictions or limitations that may apply. Consider the following:
Discussing any restrictions on the transfer amount or frequency:
- Some banks may impose limits on the transfer amount or the frequency of transfers from Apple Cash to a bank account.
- Check with your bank or review their terms and conditions to understand if there are any specific restrictions you need to consider.
Addressing limitations based on regional regulations or banking policies:
- Certain regions or countries may have regulations or banking policies that impose additional restrictions or limitations on electronic fund transfers.
- It’s advisable to familiarize yourself with the rules and regulations applicable to your specific region to ensure compliance and avoid any potential issues during the transfer process.
By considering these factors, you can better navigate the process of transferring Apple Cash to your bank account and make informed decisions regarding any associated costs, minimum balance requirements, transfer duration, and potential restrictions or limitations.
Checking Bank Eligibility for Apple Cash Transfers
Before attempting to transfer your Apple Cash to a bank account, it’s important to confirm whether your bank supports this feature. Follow these steps to check the eligibility of your bank:
Visit your bank’s official website:
- Access your bank’s official website using a web browser on your computer or smartphone.
Navigate to the Apple Cash or electronic fund transfer section:
- Look for sections related to Apple Cash, person-to-person payments, or electronic fund transfers on your bank’s website.
- Some banks may refer to Apple Cash as “Apple Pay Cash” or similar terms.
Review the supported features or services:
- Within the relevant sections, check for information regarding the ability to receive transfers from Apple Cash or link your Apple Cash to your bank account.
- Look for any specific instructions or requirements mentioned by your bank.
If you’re unable to find information about Apple Cash transfers on your bank’s website, consider the following options:
Visit Apple’s official website:
- Access Apple’s official website using a web browser on your computer or smartphone.
Navigate to the Apple Cash or Apple Pay section:
- Look for sections related to Apple Cash or Apple Pay on the website.
- Apple’s website provides information on supported banks and financial institutions for Apple Cash transfers.
Check the list of supported banks:
- Apple’s website may provide a list of supported banks or financial institutions that allow transfers from Apple Cash.
- Review the list to see if your bank is mentioned.
Contact customer support:
- If you’re still unsure about your bank’s eligibility, consider reaching out to Apple’s customer support or your bank’s customer service.
- They can provide specific information about whether your bank supports Apple Cash transfers and assist you with any questions or concerns you may have.
If your current bank doesn’t support Apple Cash transfers, you may explore alternative options. Consider the following:
Research other banks or financial institutions:
- Conduct research to identify other banks or financial institutions that do support Apple Cash transfers.
- Look for institutions that align with your financial needs and preferences.
Compare the features and services:
- Compare the features, fees, and benefits offered by different banks or financial institutions.
- Consider factors such as transfer fees, account maintenance fees, convenience, and customer reviews.
Open an account with a supporting bank:
- If you find a bank that supports Apple Cash transfers and meets your requirements, consider opening an account with them.
- Follow their account opening process, which usually involves submitting an application and providing necessary identification and documentation.
By following these steps and conducting thorough research, you can determine if your bank supports Apple Cash transfers or explore alternative banking options that facilitate this feature.
In Crux
In conclusion, knowing how to transfer Apple Cash to a bank account opens up a world of convenience and accessibility for managing your funds. With the ability to move your Apple Cash balance to your bank, you can seamlessly integrate your digital wallet with your traditional banking services.
By following the steps outlined in this guide, you can confidently initiate the transfer process and enjoy the benefits of having your Apple Cash available in your bank account. Whether you need to make purchases, pay bills, or simply have easier access to your funds, transferring Apple Cash to a bank account offers a straightforward and efficient solution.
Remember to check the eligibility of your bank, ensuring they support Apple Cash transfers. If your bank is not currently compatible, consider exploring alternative banking options that offer this feature. Research different banks and financial institutions to find one that suits your needs and aligns with your financial goals.
As you embark on your journey of transferring Apple Cash to a bank account, it’s essential to stay informed about any fees, minimum balance requirements, and processing times associated with the transfer. Understanding these factors will help you make informed decisions and avoid any surprises along the way.
Lastly, don’t hesitate to reach out to Apple’s customer support or your bank’s customer service if you encounter any difficulties or have specific questions. They are there to assist you and provide guidance throughout the transfer process.
With the ability to seamlessly transfer your Apple Cash to a bank account, you can enjoy the convenience, flexibility, and accessibility it brings to your financial transactions. Embrace this feature and take full advantage of the digital capabilities that Apple Cash and your bank offer. Explore, utilize, and make the most of this powerful tool for managing your funds with ease.
How much did you like our detailed From Apple Cash to Bank: A Step-by-Step Guide Also, please share these Blogs with your friends on social media.
Related Blogs
- Is iPhone 14 Worth the Hype
- Unblock Banned Apps
- Best Cheap VPN Services
- Antenna vs Cable TV
- iPhone 6 vs Nexus 6
- WiFi and Internet
- Apple Vision Pro
[WPSM_AC id=1293]


