


")
Time is a fundamental aspect of our lives, and in the digital age, it plays a crucial role in keeping our devices, schedules, and activities in sync. From setting alarms to receiving timely notifications, accurate time settings on Android devices are essential for smooth operations and functionality.
Imagine missing an important appointment or getting notifications at the wrong time – it can throw off our entire day. Therefore, understanding the significance of precise time settings on Android is essential to make the most of our smartphones and tablets.
In this comprehensive guide, we aim to provide you with step-by-step instructions on how to change the time on your Android devices. Whether you need to adjust the time for daylight saving, switch time zones while traveling, or simply correct an incorrect time setting, we’ve got you covered.
With our easy-to-follow instructions and helpful tips, you’ll be able to take full control of your Android’s time settings and ensure everything runs like clockwork.
The impact of accurate time settings on Android goes far beyond merely displaying the correct time on your device. Many of our daily activities rely heavily on precise time synchronization. From setting up reminders and appointments to tracking fitness goals and even receiving real-time updates on news and weather, Android applications depend on accurate time to function effectively.
Moreover, time synchronization plays a crucial role in ensuring seamless communication between devices, networks, and cloud services, ensuring that data transfer and updates occur precisely when they should.
Having an understanding of the importance of accurate time settings on Android will empower you to keep your device in perfect sync with the world around you and unlock its full potential. So, let’s dive into the world of Android time settings and master the art of time control!
Getting Started: Adjusting Time on Your Android Device
The first step in adjusting the time on your Android device is to access the settings menu. The process may vary slightly depending on the make and model of your phone or tablet, as well as the Android version it’s running. However, the general steps remain consistent across most devices.
- Unlock your Android device and go to the home screen.
- Swipe down from the top of the screen to reveal the notification panel.
- Look for the gear-shaped settings icon and tap on it to open the Settings app.
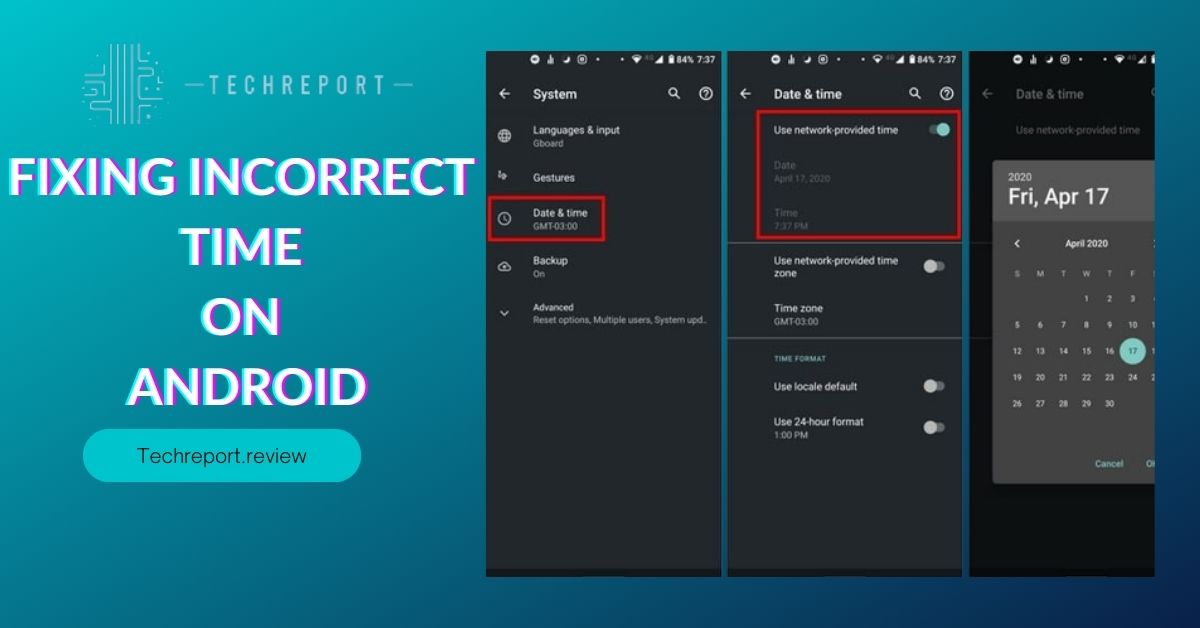
Once you’re in the Settings app, scroll down or search for the section related to date and time settings. On some devices, you may find it under “System,” “General,” or “Additional Settings.” The exact wording and location may vary, but it usually includes the terms “Date & Time” or “Time & Date.”
In the “Date & Time” or “Time & Date” section, you’ll find options to adjust the time manually. By default, Android devices are set to use network-provided time, but you can choose to set it manually if needed, especially when traveling to a different time zone.
- Tap on the option to set the time manually.
- You’ll see fields to adjust the time and date. Use the on-screen keypad or the “+” and “-” buttons to modify the values.
Be sure to select the correct time format (12-hour or 24-hour) according to your preference.
If you notice that the time on your Android device is incorrect, there are a few common reasons behind this issue. Let’s explore some troubleshooting steps to ensure accurate timekeeping:
Enable Automatic Date & Time: Sometimes, incorrect time settings occur if the automatic date and time option is disabled. Go back to the “Date & Time” settings and toggle on the option for automatic time and date.
- Check Time Zone Settings: If you’ve traveled to a different time zone, your device may not update the time automatically. Make sure to adjust the time zone settings accordingly.
- Verify Network Connectivity: Ensure that your device has a stable internet connection, as it relies on network-provided time. A poor or no internet connection may result in incorrect time settings.
- Restart Your Device: Sometimes, a simple device restart can resolve minor time-related glitches.
By following these steps, you can easily adjust the time on your Android device and troubleshoot any incorrect time issues, ensuring that your phone or tablet keeps accurate time for all your daily activities and interactions.
Time Customization: Personalizing Your Android Device
Android allows you to choose between two common time formats: the 12-hour format (AM/PM) or the 24-hour format (military time). The choice is a matter of personal preference and ease of time reading. Here’s how to switch between these formats:
- Go to the “Date & Time” or “Time & Date” section in your device’s settings, as described in the previous section.
- Look for the “Time Format” option and tap on it.
- You’ll see a dropdown menu or toggle switch that allows you to choose between the 12-hour and 24-hour formats. Select your preferred format.
- Once you’ve made your selection, the time on your device’s clock will be displayed in the chosen format.
Time zones play a crucial role in accurate timekeeping, especially when you’re traveling or living in different regions. Android devices allow you to customize the time zone settings to match your current location or destination. Here’s how to do it:
- Go back to the “Date & Time” or “Time & Date” section in the settings.
- Look for the “Time Zone” option and tap on it.
- You’ll see a list of available time zones. Scroll through the list or use the search bar to find your current location or the city you’re traveling to.
- Tap on the correct time zone to apply the setting.
Now, your device will automatically adjust the time based on the selected time zone, ensuring that you always have the correct local time at your fingertips.
Enabling automatic time and date settings is an excellent way to ensure hassle-free timekeeping without the need for manual adjustments. Android devices can use network-provided time or GPS location to automatically update the time and date. Here’s how to enable this feature:
- In the “Date & Time” or “Time & Date” section, find the option for “Automatic Date & Time” and “Automatic Time Zone.”
- Toggle on both options to enable automatic time and date settings.
With these settings enabled, your Android device will automatically synchronize its time and date with the network or GPS time, providing you with the correct time regardless of your location.
By customizing your Android device’s time format, and time zone settings, and enabling automatic time and date settings, you can ensure that the time displayed on your device is tailored to your preferences and accurate for your current location or travel destinations.
Mastering Widgets: Customizing Android Clock
One of the advantages of using Android devices is the ability to customize various aspects of the user interface, including clock widgets on the home screen. Clock widgets not only display the time but also provide quick access to alarms, timers, and sometimes even weather information. Here’s how you can personalize the appearance and layout of your Android clock widget:
- Long-press on a space on your device’s home screen. This action will bring up the widget customization menu.
- Tap on the “Widgets” or “Add Widgets” option, depending on your device and Android version.
- Scroll through the list of available widgets until you find the clock widget you want to use. There may be different clock styles to choose from, such as analog or digital clocks.
- Once you’ve selected the clock widget, drag it to the desired location on your home screen.
- Release your finger to place the widget, and you’ll see options to resize or customize it.
- Some Android devices and custom launchers may offer additional clock widget customization options. Tap on the widget to access these settings, where you can change the clock style, font, and color, or even add additional information like battery status or upcoming events.
If you frequently deal with different time zones due to business or travel, integrating world clock widgets on your Android home screen can be highly beneficial. World clock widgets allow you to monitor the time in various cities around the world simultaneously. Here’s how to add and manage world clock widgets:
- Follow the same steps as before to access the widget customization menu on your home screen.
- Look for the “World Clock” or “Clock” widget with multiple time zone support. Tap on it to select.
- Drag the world clock widget to your home screen, and you’ll see an empty time zone list.
- Tap on the empty list to add time zones. You can search for cities or locations, and the widget will display the current time for each added location.
- To remove or edit time zones, tap on the widget and access the settings. You can add or delete locations as needed.
- Some Android devices and custom launchers may offer additional customization for world clock widgets. Explore these options to fine-tune the appearance and functionality of the widget.
By mastering the customization of Android clock widgets, you can not only make your device’s home screen more visually appealing but also gain quick access to important time-related information. Adding world clock widgets further enhances your productivity and helps you stay connected with different time zones effortlessly.
Advanced Time Adjustments: Android Emulator
Android emulators are essential tools for developers to test their applications on a virtual Android device. Being able to adjust the time and date on the emulator is crucial for simulating different scenarios during app development. Here’s how you can modify the time settings on an Android emulator:
- Launch the Android emulator on your computer using Android Studio or other emulator software.
- Once the emulator is running, go to the home screen, or open the app drawer.
- Locate and open the “Settings” app on the emulator. It usually resembles a gear or cog icon.
- In the settings menu, scroll down and find the “System” or “System & Updates” option. Tap on it.
- Look for “Date & time” or “System Date & time” in the system settings. Tap on it to access the time settings.
- By default, the emulator should be set to use the system time of your computer. To change the time manually, toggle off the “Automatic date & time” or “Use system time” option.
- Once disabled, you can now adjust the time and date according to your requirements. You can change the hour, minute, day, month, and year using the provided controls.
- After setting the desired time and date, tap the “Save” or “Apply” button to confirm the changes.
Remember that the changes made to the time and date on the Android emulator are only applicable within the emulator’s environment and do not affect the time settings on your actual Android device.
To ensure that the time on your Android device is always accurate, you can synchronize it with time servers. Time servers are special servers on the internet that provide precise time information. Android devices have the option to synchronize time automatically with these servers. Here’s how you can enable time synchronization:
- Open the “Settings” app on your Android device.
- Scroll down and select “System” or “System & updates,” depending on your device.
- Look for “Date & time” or “System Date & time” in the system settings.
- Enable the “Automatic date & time” or “Use network-provided time” option. This will allow your Android device to automatically synchronize its time with the time servers provided by your network or carrier.
- Additionally, you can also enable the “Automatic time zone” option to have your device update its time zone based on your current location.
By enabling time synchronization with time servers, you can be confident that your Android device always displays the correct time and date, regardless of where you are located or if you travel between different time zones.
Time Management for Android TV
Android TV offers a seamless entertainment experience, and it’s essential to ensure that the time settings are accurate for proper program schedules and content playback. Here’s how you can adjust the time settings on your Android TV:
- Navigate to the home screen of your Android TV by pressing the home button on your remote.
- Using the arrow keys on your remote, scroll to the top-right corner of the screen to access the “Settings” gear icon.
- Click on the “Settings” gear icon to open the Android TV settings menu.
- In the settings menu, navigate to the “Device Preferences” or “Device” section. The location of this option may vary depending on your Android TV model.
- Look for the “Date & time” or “System” section in the device preferences.
- In the “Date & time” or “System” section, you will find options to adjust the time, date, and time zone. Click on the corresponding options to make changes.
- To adjust the time, use the arrow keys to change the hour and minute. You may also have the option to set the time format to either 12-hour or 24-hour.
- To change the date, you can typically select the month, day, and year.
- To modify the time zone, click on the “Time zone” option, and you’ll be presented with a list of available time zones. Select the one that matches your location or time zone preference.
- Once you’ve made the desired changes, click on the “Save” or “Apply” button to apply the new time settings.
Android TV also offers the option to automatically synchronize its time with time servers, ensuring that the time is always accurate without manual adjustments. To enable automatic time sync on your Android TV, follow these steps:
- Go back to the “Date & time” or “System” section in the Android TV settings.
- Look for the “Automatic date & time” or “Automatic time zone” option.
- Toggle on the “Automatic date & time” or “Automatic time zone” switch. This will allow your Android TV to synchronize its time and date automatically with time servers on the internet.
- If prompted, you may need to grant permission for the TV to access the internet and synchronize the time.
By enabling automatic time synchronization on your Android TV, you won’t have to worry about adjusting the time settings manually. Your Android TV will stay up to date with accurate time and date information, ensuring that you never miss your favorite shows or experience playback issues due to incorrect time settings.
In Crux
In this comprehensive guide, we’ve explored the significance of accurate time settings on your Android device and how they play a crucial role in ensuring smooth operations and functionality. From adjusting the time manually to utilizing automatic time synchronization, you now know to take complete control of time on your Android device.
Accurate time settings are essential for various aspects of your daily life, including timely notifications, synchronized calendars, accurate alarms, and smooth content playback. By mastering the art of adjusting the time on your Android device, you can optimize your user experience and make the most out of your smart device.
As you’ve learned throughout this guide, Android time settings are highly customizable, allowing you to tailor your device’s time to your preferences and needs. Whether you want to switch between 12-hour and 24-hour formats, adjust the time zone for travel or international connections, or integrate world clock widgets for quick access to different time zones, you now have the tools to do it all.
To ensure smooth and hassle-free time management on your Android device, remember to:
- Regularly check your time settings: Verify the accuracy of your device’s time settings to avoid any inconvenience in your daily activities.
- Enable automatic time synchronization: Utilize the automatic time and date settings to keep your Android device in sync with accurate time information effortlessly.
- Customize clock widgets: Personalize your home screen with customized clock widgets that match your style and display relevant time zone information.
- Troubleshoot time issues: If you encounter any discrepancies with your device’s time, troubleshoot and resolve them promptly by checking settings and ensuring proper internet connectivity.
- Keep your device up to date: Regularly update your Android device’s software to ensure the latest time management features and improvements.
By mastering Android time settings and implementing these time management tips and tricks, you can make the most of your Android experience. Take control of time on your device and ensure that every second counts in your connected world. Embrace the convenience of accurate time settings and let your Android device work seamlessly with your daily life.
How much did you like our detailed The Time Machine: Fixing Incorrect Time on Android Please share these Blogs with your friends on social media.
Related Blogs
- Is iPhone 14 Worth the Hype
- iPhone 15 Pro
- Apple CarPlay
- Apple Watch
- iPhone 6 vs Nexus 6
- Apple Vision Pro
FAQs about Fixing Incorrect Time on Android
Can I change the time format from 12-hour to 24-hour on Android?
Yes, you can easily switch between the 12-hour and 24-hour time format on your Android device. Head to the "Settings" app, then navigate to "System" or "Date & Time." Look for the "Use 24-hour format" option and toggle it on to switch to the 24-hour time format or toggle it off to revert to the 12-hour format.
How to set the time and date automatically on Android?
To set the time and date automatically on Android, access the "Settings" app, then go to "System" or "Date & Time." Enable the "Automatic date and time" option. This will use your network or GPS location to automatically update your device's time and date, ensuring accuracy without manual intervention.
Can I customize the clock widget's appearance on my Android home screen?
Yes, you can customize the appearance of the clock widget on your Android home screen. Long-press on an empty space on your home screen, then select "Widgets." Scroll through the widget options to find the clock widget you're using, then tap and hold it to drag it to your home screen. Some Android devices also allow you to resize the widget or change its style and color through various customization options.
How do I adjust the time and date on an Android emulator?
When using an Android emulator for development purposes, you can adjust the time and date settings directly from the emulator's settings menu. Open the emulator, click on the three-dot menu, then go to "Settings" or "System Settings." Look for "Date & Time" in the options, where you can manually change the time and date as needed.
How to change the time zone on my Android phone?
To change the time zone on your Android phone, access the "Settings" app, then navigate to "System" or "Date & Time." Look for "Time Zone" and tap on it. You can either choose a time zone from the list or use your current location to set the time zone automatically.
How do I synchronize the time on my Android device with a specific time server?
Synchronizing your Android device's time with a specific time server can be done by enabling the "Automatic date and time" option in the "Settings" app under "System" or "Date & Time." When enabled, your device will synchronize with the default time server associated with your network or GPS location.
How to change the time on Android TV for accurate program schedules?
Changing the time on Android TV is similar to other Android devices. Access the "Settings" app on your Android TV, then go to "Device Preferences" or "Date & Time." From there, you can manually set the time and date or enable automatic time synchronization to ensure accurate program schedules.
What to do if the time on my Android device keeps resetting?
If your Android device's time keeps resetting, check your battery and power-saving settings. Some devices may automatically reset the time when the battery is low or when you have aggressive power-saving settings enabled. Adjust these settings as needed to prevent time discrepancies.
How do I transfer photos from Android to iPhone?
To transfer photos from Android to iPhone, you can use various methods like Google Photos, cloud storage, or third-party apps. One way is to use Google Photos by uploading your photos to the app on your Android device, then signing in to the same Google account on your iPhone to access them. Alternatively, you can use cloud storage services like Dropbox or OneDrive to transfer photos between devices. Some third-party apps also offer cross-platform photo transfer options.


