


In this digital age, the ability to capture and share what’s happening on your iPhone X screen has become increasingly valuable. Whether you want to create tutorial videos, showcase your gaming skills, or simply save important moments from your device, screen recording on iPhone X provides a versatile solution. With just a few taps, you can capture everything happening on your screen and save it as a video file.
The demand for screen recording has skyrocketed in recent years. Professionals, content creators, educators, and even everyday users are finding innovative ways to leverage this feature. It allows you to demonstrate app functionalities, guide others through complex processes, or document important information for later reference. Moreover, the ability to screen record without the need for additional hardware or complex setups makes it a convenient and accessible tool for users of all levels of expertise.
Whether you’re an aspiring YouTuber, a tech enthusiast, or simply someone looking to harness the power of screen recording on your iPhone X, this comprehensive guide will walk you through everything you need to know. From understanding the built-in features to exploring advanced techniques and troubleshooting, you’ll gain the knowledge and skills to make the most out of screen recording on your iPhone X. Let’s dive in and unlock the potential of capturing your screen like never before.
Understanding Screen Recording on iPhone X
Screen recording is a feature that allows you to capture everything that happens on the screen of your iPhone X and save it as a video file. It essentially records a video of your screen activity, including app interactions, gameplay, tutorials, presentations, and more. With screen recording, you can preserve and share your experiences, demonstrate processes, or create engaging content directly from your device.
To initiate screen recording on iPhone X, you can access the built-in screen recording function from the Control Center. By tapping the screen recording icon, a countdown will appear, indicating that the recording is about to start. Once activated, your iPhone X will capture every action, gesture, and visual element on the screen, including audio if you choose to record it.
- Content Creation: Screen recording is a powerful tool for content creators, enabling them to produce engaging videos for tutorials, app reviews, product demonstrations, and more. It allows you to showcase specific features, guide viewers through processes, and create visually-rich content without the need for expensive equipment or elaborate setups.
- Gaming: iPhone X offers remarkable gaming capabilities, and screen recording provides a way to capture and share your gaming achievements. Whether you want to create gaming tutorials, share gameplay highlights, or stream your gaming sessions on platforms like Twitch, screen recording on iPhone X is an excellent option.
- Education and Training: Screen recording can be immensely valuable for educators, trainers, and students. It enables the creation of instructional videos, online courses, and tutorials that visually demonstrate concepts, software workflows, or step-by-step procedures. Screen recording facilitates effective knowledge transfer and enhances the learning experience.
- Troubleshooting and Support: When encountering technical issues or seeking assistance, screen recording can be a helpful tool. You can record the problem you’re facing on your iPhone X and share the video with technical support or online communities. This way, others can visually understand the issue and provide more accurate guidance or solutions.
- Personal Use: Screen recording on iPhone X is not limited to professional or educational purposes. It can also be used to capture and preserve personal memories, such as recording video calls with loved ones, saving important conversations, capturing social media content, or documenting app interactions for future reference.
The applications of screen recording on iPhone X are diverse and cater to various needs. It empowers users to share knowledge, create compelling content, troubleshoot effectively, and capture moments in a dynamic and engaging manner. With a deeper understanding of screen recording and its benefits, let’s delve into the practical steps of initiating and utilizing this feature on your iPhone X.
Built-in Screen Recording Feature on iPhone X
The iPhone X comes equipped with a built-in screen recording feature that allows you to capture and save videos of your screen activity without the need for third-party apps. This native functionality provides a convenient and straightforward way to record your iPhone X screen.
- Step 1: Open the Control Center: Swipe down from the top-right corner of the screen to access the Control Center. On older iOS versions, swipe up from the bottom of the screen.
- Step 2: Locate the Screen Recording Icon: In the Control Center, look for the screen recording icon. It resembles a solid white circle inside a larger circle.
- Step 3: Start the Screen Recording: Tap the screen recording icon to initiate the recording process. A countdown of three seconds will appear, indicating that the recording is about to begin.
- Step 4: Record Your Screen: Once the countdown finishes, your iPhone X will start recording the screen. You can freely navigate through apps, perform actions, and demonstrate processes while the recording is in progress.
- Step 5: Control the Recording: While screen recording, you’ll see a red status bar at the top of the screen, indicating that the recording is active. You can access the Control Center at any time during the recording by swiping down from the top-right corner of the screen and tapping the red recording indicator. From there, you can pause or stop the recording.
- Step 6: Stop the Screen Recording: To end the screen recording, open the Control Center again and tap the red recording indicator. Alternatively, you can tap the red status bar at the top of the screen and select “Stop.”
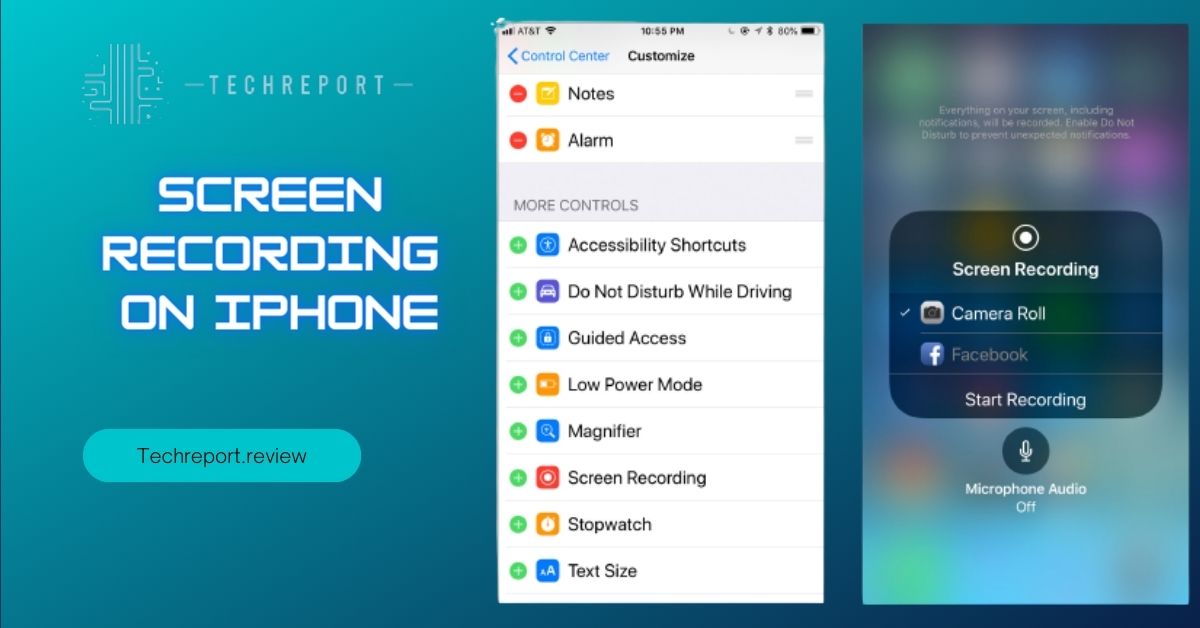
Control Center: As mentioned earlier, the most common method is by accessing the Control Center. Simply swipe down from the top-right corner of the screen to reveal the Control Center, and you’ll find the screen recording icon. Tap the icon to start the recording.
Settings: If you prefer to access the screen recording feature through the settings, follow these steps:
- Open the “Settings” app on your iPhone X.
- Scroll down and tap on “Control Center.”
- Under the “More Controls” section, locate “Screen Recording.”
- Tap the green plus (+) icon next to “Screen Recording” to add it to the Control Center.
Once added, you can access the screen recording function by opening the Control Center as described above.
Siri Shortcut: If you frequently use screen recording on your iPhone X, you can create a Siri Shortcut for quick access. Here’s how:
- Open the “Settings” app on your iPhone X.
- Tap on “Siri & Search.”
- Scroll down and tap on “All Shortcuts.”
- Look for “Screen Recording” and tap on it.
- Tap “Add to Siri” and record a custom phrase to activate the screen recording feature through Siri.
By following these steps, you can enable screen recording on your iPhone X through different methods, providing you with flexibility and convenience when capturing your screen activity.
Now that you’re familiar with the built-in screen recording feature on iPhone X and how to start a recording, let’s explore some additional settings and features that can enhance your screen recording experience.
Limitations and Considerations for Screen Recording on iPhone X
While the built-in screen recording feature on iPhone X offers great convenience, it’s essential to be aware of its limitations and consider certain factors before diving into screen recording. Here are some key points to keep in mind:
- Battery Life: Screen recording can consume a significant amount of battery power, especially if you’re recording lengthy videos or performing resource-intensive tasks. It’s advisable to have your iPhone X connected to a power source during extended recording sessions to preserve battery life.
- Storage Space: Screen recordings can take up a considerable amount of storage space on your iPhone X, especially if you record long videos or frequently capture screen activity. It’s important to regularly transfer and backup your recordings or manage your device’s storage to ensure you have enough space for new recordings.
- Privacy Considerations: When screen recording, be mindful of the content you capture, as it may include sensitive or private information. Ensure that you have the necessary permissions and legal rights to record certain content, especially if it involves other individuals or copyrighted material. Respect the privacy of others and adhere to applicable laws and regulations.
- Restricted Content: Certain apps or platforms may have restrictions on screen recording, particularly for copyrighted material, streaming services, or secure content. It’s important to respect these restrictions and abide by the terms of use of the apps and services you’re using.
- Audio Recording: By default, the screen recording feature on iPhone X captures both the audio from your device and any external audio, such as music or ambient noise. However, be mindful of any legal restrictions or privacy concerns when recording audio. Avoid recording conversations or audio without the consent of all parties involved, as it may violate privacy laws.
- Screen Orientation: The screen recording feature on iPhone X captures the screen in the current orientation of your device. If you want to record in landscape mode, make sure to rotate your iPhone X before initiating the screen recording.
- Screen Recording Indicator: During screen recording, a red status bar appears at the top of the screen, indicating that the recording is in progress. This status bar is visible in the recorded video as well. If you prefer not to include the red status bar in your recordings, you can disable it by going to Settings > Control Center > Customize Controls and removing the “Screen Recording” option from the Control Center.
- Accessibility Features: Some accessibility features, such as Guided Access or VoiceOver, may interfere with screen recording or affect the recording output. If you encounter any issues or unexpected behavior while using accessibility features and screen recording simultaneously, consider adjusting the accessibility settings or disabling certain features temporarily.
By being mindful of these limitations and considerations, you can make the most of the screen recording feature on your iPhone X while ensuring a smooth and hassle-free recording experience.
Now that we’ve explored the limitations and considerations, let’s move on to the next section, where we’ll delve into post-recording options and how to edit and share your screen recordings on iPhone X.
Editing Screen Recordings on iPhone X
After capturing a screen recording on your iPhone X, you may want to make some adjustments or add a personal touch to your recordings. Luckily, the built-in Photos app provides basic editing tools that allow you to enhance and customize your screen recordings. Here’s how you can edit screen recordings on iPhone X using the Photos app:
- Open the Photos app: Locate and open the Photos app on your iPhone X. You can find it on your home screen or by swiping down and typing “Photos” in the search bar.
- Find the screen recording: Navigate to the “Albums” tab at the bottom of the screen and select the “Screenshots” album. Your screen recordings are automatically saved as videos in this album.
- Select the screen recording: Scroll through the album and find the screen recording you want to edit. Tap on it to open it in full screen.
- Tap “Edit”: Once the screen recording is open, tap on the “Edit” button located at the top right corner of the screen. This will take you to the editing interface.
- Trim the recording: If you want to remove any unwanted sections from the beginning or end of the recording, use the trimming feature. At the bottom of the screen, you’ll see a timeline representing the duration of the recording. Drag the yellow handles on either side to adjust the start and end points of the recording. Tap “Done” when you’re satisfied with the trim.
- Add annotations: The Photos app provides basic annotation tools that allow you to draw, highlight, and add text to your screen recordings. Tap the three-dot menu icon (•••) located at the bottom right corner of the screen, then select “Markup” from the pop-up menu. You can now use your finger or an Apple Pencil (if available) to draw, highlight, or add text to the recording. Tap “Done” when you’re finished with the annotations.
- Adjust exposure and filters (optional): If you want to further enhance the appearance of your screen recording, you can adjust exposure, apply filters, or make other adjustments using the editing tools in the Photos app. Tap the “Adjust” icon (three horizontal sliders) at the bottom of the screen to access these options. Experiment with the available tools to achieve the desired look for your recording.
- Save or share the edited recording: Once you’re satisfied with the edits, tap “Done” at the bottom right corner of the screen. You’ll be prompted to either save a new copy of the edited recording or replace the original recording. Choose the option that suits your preference. If you want to share the edited recording, tap the share icon (box with an arrow) at the bottom left corner of the screen and select the desired sharing method (e.g., AirDrop, Messages, Email, etc.).
By following these steps, you can easily edit your screen recordings on iPhone X using the built-in Photos app. Remember to save a copy of the original recording before making any edits, as editing the recording will permanently alter the original file.
In the next section, we’ll discuss different methods for sharing your screen recordings directly from your iPhone X to various platforms and applications.
Now, let’s move on to the next section, where we’ll explore the various options for sharing your screen recordings from iPhone X.
Sharing Screen Recordings from iPhone X to Social Media
Sharing your screen recordings on social media platforms can be a great way to showcase your content or demonstrate a process to a wider audience. Here’s how you can share your screen recordings directly from your iPhone X to popular social media platforms:
- Open the Photos app: Locate and open the Photos app on your iPhone X.
- Find the screen recording: Navigate to the “Albums” tab at the bottom of the screen and select the “Screenshots” album. Your screen recordings are automatically saved as videos in this album.
- Select the screen recording: Scroll through the album and find the screen recording you want to share. Tap on it to open it in full screen.
- Tap the share icon: At the bottom left corner of the screen, you’ll see a share icon (box with an arrow pointing upward). Tap on it to open the sharing options.
- Choose a social media platform: From the sharing options, you’ll see a list of apps and platforms you can share the screen recording with. Look for the social media platform you want to share the recording on, such as Instagram, Facebook, Twitter, or YouTube. Tap on the respective app icon.
- Add a caption (optional): Once you select the social media platform, you’ll be redirected to the app, where you can add a caption or description to your screen recording. Write a compelling caption that provides context or highlights the key points of your recording. You can also add relevant hashtags to increase the discoverability of your content.
- Customize settings (optional): Depending on the social media platform, you may have additional options to customize your post, such as selecting a thumbnail or choosing privacy settings. Explore the available options and make adjustments according to your preferences.
- Share the screen recording: After adding the caption and customizing the settings, tap the “Share” or “Post” button to publish your screen recording on the selected social media platform. The screen recording will be uploaded, and you’ll have the option to view it directly on the platform or share the post with your followers.
- Choose the appropriate platform: Consider the nature of your screen recording and the target audience. Select the social media platform that aligns with your content and where you’re likely to reach the desired audience. For example, if your recording is more professional or instructional, platforms like LinkedIn or YouTube might be more suitable. If it’s a casual or personal recording, platforms like Instagram or Facebook could work well.
- Optimize for mobile viewing: Keep in mind that most social media platforms are primarily accessed via mobile devices. Ensure your screen recording is optimized for mobile viewing by checking its orientation, resolution, and aspect ratio. If necessary, you can use video editing apps or the built-in editing features on your iPhone X to make adjustments before sharing.
- Engage with your audience: Once you’ve shared your screen recording, actively engage with your audience by responding to comments, addressing questions, or starting conversations related to your content. This can help you build a community, establish your expertise, and foster meaningful connections with your viewers.
- Consider privacy concerns: Before sharing a screen recording, ensure that it doesn’t contain any sensitive or personal information that could compromise your privacy or violate the privacy of others. Be mindful of what’s visible in your recording and edit or blur out any sensitive content if necessary.
By following these steps and best practices, you can easily share your screen recordings from iPhone X to popular social media platforms, expanding your reach and sharing valuable content with your audience.
In Crux
Screen recording on iPhone X is a powerful and versatile feature that allows you to capture and share your device’s screen with others. Whether you want to create tutorials, showcase your gaming skills, demonstrate an app, or share interesting content with your friends and followers, the screen recording feature on iPhone X opens up a world of possibilities.
In this comprehensive guide, we have covered everything you need to know about screen recording on iPhone X. We started by understanding the concept of screen recording and its benefits. Then, we explored the built-in screen recording feature on iPhone X and learned how to initiate a screen recording session with ease. We also discussed important considerations, such as limitations, battery life, storage space, and privacy concerns, to ensure a smooth and optimal screen recording experience.
Furthermore, we delved into editing options available on the Photos app, empowering you to trim, add annotations, and make adjustments to your screen recordings directly on your iPhone X. We also provided step-by-step instructions on how to share your screen recordings seamlessly to popular social media platforms, allowing you to reach a wider audience and share your valuable content.
As you embark on your screen recording journey with your iPhone X, we encourage you to explore the various possibilities and utilize this feature to its fullest potential. Whether you’re a content creator, educator, gamer, or simply someone who enjoys sharing interesting moments from their device, screen recording can add a dynamic and engaging element to your content.
Experiment with different settings, explore third-party apps for additional features and customization options, and don’t be afraid to get creative with your screen recordings. The more you practice and experiment, the better you’ll become at capturing and sharing captivating screen recordings.
Remember to always respect the privacy and rights of others when recording and sharing content. Be mindful of what you choose to record and consider seeking permission from individuals or organizations if necessary.
With the knowledge and techniques shared in this guide, you’re well-equipped to embark on your screen recording journey on iPhone X. So go ahead, capture those amazing moments, share your expertise, and create engaging content that resonates with your audience.
Thank you for choosing this guide as your resource for learning how to screen record on iPhone X. We hope you found it helpful and that it empowers you to explore new possibilities with this exciting feature. Happy screen recording!
How much did you like our detailed How to Screen Record on iPhone X Like a Pro : Step-by-Step. Please share these Blogs with your friends on social media.
Related Blogs
- Is iPhone 14 Worth the Hype
- iPhone 15 Pro
- Apple CarPlay
- Apple Watch
- iPhone 6 vs Nexus 6
- Apple Vision Pro
FAQs about How to Screen Record on iPhone X
Can I screen record my iPhone X without any third-party apps?
Yes, iPhone X has a built-in screen recording feature that eliminates the need for third-party apps.
How do I stop or end a screen recording session on iPhone X?
To stop a screen recording on iPhone X, you can tap the red recording indicator in the status bar or swipe up from the bottom and tap the Stop button in Control Center.
Can I record both audio and video while screen recording on iPhone X?
Yes, you can record both audio and video during a screen recording on iPhone X. By default, the microphone audio is also captured along with the screen recording.
Are there any limitations to screen recording on iPhone X?
While screen recording on iPhone X, certain apps or content that use Digital Rights Management (DRM) protection might not be recordable. Additionally, some apps may restrict screen recording for privacy or security reasons.
How do I access the screen recording function on iPhone X?
The screen recording function can be accessed by swiping down from the top-right corner of the screen to open Control Center, then tapping the Screen Recording button.
Can I edit the screen recordings on my iPhone X after capturing them?
Yes, you can edit screen recordings on your iPhone X using the built-in Photos app. You can trim the recording, add annotations, and make other adjustments to enhance your screen recording.
What formats are screen recordings saved in on iPhone X?
Screen recordings on iPhone X are saved in the MP4 format, which is a widely supported video format.
Can I screen record a specific app or game on iPhone X?
Yes, you can screen record a specific app or game on iPhone X by opening the app or game first, then initiating the screen recording from Control Center.
What should I do if screen recording is not working on iPhone X?
If screen recording is not working on your iPhone X, you can try restarting your device, ensuring that the screen recording feature is enabled in Settings, or updating to the latest iOS version. If the issue persists, you may need to contact Apple Support for further assistance.


