


As Chromebooks continue to gain popularity for their simplicity and versatility, users often find themselves accumulating various apps over time. While apps enhance productivity and provide entertainment, managing a clutter-free environment becomes essential for optimal performance. This blog delves into the significance of app management on your Chromebook and guides you through the process of deleting unwanted apps efficiently.
Chromebooks are designed for seamless browsing and productivity, but the number of installed apps can impact the system’s speed and available storage. Unnecessary apps can also clutter the launcher, making it harder to find the ones you need. By understanding app management, users can keep their Chromebooks running smoothly and create a customized, organized workspace that aligns with their needs.
This blog provides a comprehensive step-by-step guide on how to delete apps on Chromebook. Whether you want to uninstall Android apps, remove extensions, or delete Linux applications, we have you covered. The blog explores various scenarios, such as deleting pre-installed apps and troubleshooting issues when apps won’t delete. Additionally, we will address app data retention concerns, explaining what happens to your data when you remove an app.
From beginner to advanced users, everyone will find useful tips and tricks for app management on Chromebook. Whether you are new to Chrome OS or a seasoned user, this blog aims to empower you to make informed decisions about app deletion, enabling you to declutter your Chromebook and improve its performance. Let’s dive into the world of Chromebook app management and create a seamless, clutter-free experience for your device.
App Deletion on Chromebook: Basics and Options
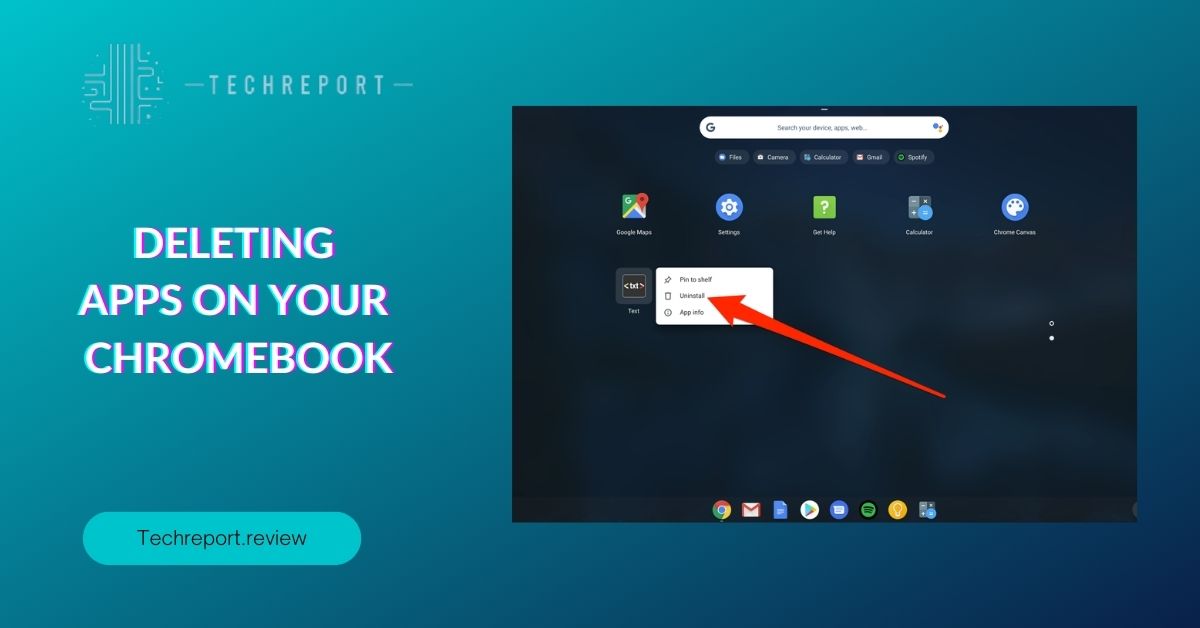
One of the most straightforward methods to delete apps on a Chromebook is through the launcher. Follow these steps:
- Locate the app you want to delete in the launcher. You can find the launcher at the bottom-left corner of your screen.
- Right-click on the app icon. A context menu will appear.
- Click on “Uninstall” from the context menu. A confirmation pop-up will appear.
- Click “Uninstall” again to confirm the deletion. The app will be removed from your Chromebook.
If you have Android apps installed on your Chromebook from the Google Play Store, you can delete them using a slightly different process:
- Open the “Launcher” and locate the Android app you wish to remove.
- Press and hold the app icon. A menu will appear.
- Select “Uninstall” from the menu.
- Click “Uninstall” again in the confirmation pop-up to remove the Android app from your Chromebook.
Chrome extensions are additional tools that enhance your browsing experience. If you have installed extensions from the Chrome Web Store and want to delete them, here’s how:
- Click on the three-dot menu icon (⋮) in the top-right corner of the Chrome browser.
- From the dropdown menu, hover over “More tools.”
- In the “More tools” sub-menu, click on “Extensions.” This will open the Extensions page.
- Locate the extension you want to delete and click on the “Remove” button next to it.
- In the confirmation pop-up, click “Remove” again to delete the extension.
By following these simple steps, you can efficiently manage and remove unwanted apps from your Chromebook. Whether you want to clean up your launcher or uninstall Android apps and extensions, these options give you full control over your Chromebook’s app ecosystem.
Permanently Removing Apps from Chromebook
To permanently remove apps from your Chromebook, you can follow these simple steps:
- Open the “Launcher” by clicking on the circular icon located in the bottom-left corner of your screen.
- Find the app you want to delete in the launcher. Right-click on the app icon to bring up the context menu.
- From the context menu, click on “Uninstall.” A confirmation pop-up will appear.
- Click “Uninstall” again to confirm the deletion. The app will be permanently removed from your Chromebook.
When you delete an app, it’s essential to consider clearing its data and freeing up storage space on your Chromebook. To clear app data:
- Click on the “Launcher” and open the “Settings” by clicking on the gear-shaped icon.
- In the “Settings” menu, select “Apps.”
- You will see a list of all installed apps on your Chromebook. Locate the app you just deleted or any other app that you want to clear data for.
- Click on the app name to open its details page.
- Under the “Storage usage” section, click on the “Clear data” button. This will remove any locally stored data associated with the app.
By clearing app data, you can ensure that all remnants of the deleted app are removed from your Chromebook, freeing up valuable storage space for other applications and files.
Managing apps on your Chromebook is an essential part of keeping your device organized and efficient. By following these step-by-step guides and clearing app data when necessary, you can maintain a clutter-free and smooth-running Chromebook experience.
App Deletion and Its Effects on App Data
When you delete an app from your Chromebook, the app’s data and settings are also removed. This means that any locally stored information, such as preferences, customizations, or game progress, will be deleted along with the app. However, some apps may have cloud-based storage or synchronization, in which case the data associated with the app may be retrievable if you reinstall the app later.
It is crucial to understand that app data deletion is permanent, and there is no built-in “trash” or “recycle bin” feature for recovering deleted app data on Chromebooks. Therefore, before deleting an app, it is essential to back up any data you want to keep, especially if the app does not have cloud storage or synchronization options.
To back up app data before deleting an app on your Chromebook, you can follow these steps:
- Check if the app has built-in cloud storage or synchronization features. If it does, ensure that the app data is properly synced before proceeding with the deletion.
- Manually back up any locally stored data or settings associated with the app. This can include exporting settings, saving files to Google Drive, or copying data to an external storage device.
- For Android apps, if you have enabled “Google Backup” in your Chromebook settings, some app data may be automatically backed up to your Google account. To check and manage this, go to “Settings” > “Google Play Store” > “Manage Android preferences” > “Backup.”
- For Linux apps, some applications may have backup options within the app settings. Check the documentation or support resources for the specific Linux app you are using to see if data can be exported or backed up.
By proactively backing up your app data, you can avoid the risk of losing important information when deleting an app. While Chromebooks are designed to work seamlessly with cloud-based storage and synchronization, it is always a good practice to take extra precautions and create manual backups for added peace of mind.
Limitations and Considerations for App Deletion
On Chromebooks, pre-installed apps often come as part of the Chrome OS, and they serve essential functions for the system’s operation. As a result, Chrome OS does not allow users to uninstall or delete these pre-installed apps directly from the Launcher. These apps are integrated into the core functionalities of the operating system and play a vital role in ensuring a smooth user experience.
While you cannot uninstall pre-installed apps, you can manage some of their settings or disable them if you don’t want to use them actively. To do this, go to “Settings” > “Apps” and search for the pre-installed app. From there, you can disable the app, preventing it from running and taking up system resources.
Some apps on your Chromebook may be linked to external accounts or services, such as Google Workspace (formerly G Suite) applications or third-party apps that require specific authentication. Deleting these apps from your Chromebook will not delete your accounts from the external services, but it may disassociate the app’s connection with those accounts.
Before deleting an app that is linked to an external account, consider the following:
- Verify if the app requires authentication with an external account. If it does, deleting the app from your Chromebook will only remove its presence on the device but won’t affect your account on the external service.
- If you want to remove the app entirely from your Google account or another linked service, you may need to visit the associated service’s settings or account management page to revoke access or remove the app’s permissions.
- Keep in mind that some apps, particularly those integrated with your Google Workspace account, may be necessary for productivity and collaboration. Deleting them may limit your ability to access certain features or files associated with those apps.
Always consider the implications of deleting an app that may be connected to external accounts or services. If you are unsure about the consequences, review the app’s documentation or support resources or seek assistance from the service provider before proceeding with the deletion.
By understanding the limitations and considerations for app deletion on your Chromebook, you can make informed decisions and manage your apps effectively without compromising your overall user experience or productivity.
In Crux
Managing your apps on a Chromebook is essential for maintaining optimal performance and productivity. Deleting apps you no longer use or need can free up valuable storage space, reduce clutter, and improve system responsiveness.
Effective app management on your Chromebook is crucial for a smooth and productive experience. Keep the following practices in mind:
- Regular Cleanup: Periodically review and declutter your Chromebook by removing apps you no longer use or need.
- App Permissions: When installing new apps, be mindful of the permissions they request. Only grant necessary permissions to protect your privacy and security.
- App Organization: Arrange your apps into folders on the app launcher for easier access and a cleaner interface.
- Check for Updates: Ensure your apps are up-to-date, as updates often bring bug fixes, new features, and improved performance.
- App Extensions: Manage Chrome browser extensions to prevent unnecessary clutter and ensure a smooth browsing experience.
By following these tips and mastering the art of app deletion, you can maintain an efficient and clutter-free Chromebook, providing you with a seamless and enjoyable user experience. Remember that regular app maintenance is key to keeping your device in top shape and maximizing its potential for enhanced productivity.
How much did you like our detailed Uninstall and Unwind: Deleting Apps on Chromebook. Please share these Blogs with your friends on social media.
Related Blogs
- Is iPhone 14 Worth the Hype
- iPhone 15 Pro
- Apple CarPlay
- Apple Watch
- iPhone 6 vs Nexus 6
- Apple Vision Pro
FAQs about Deleting Apps on Your Chromebook
Can I remove Android apps from my Chromebook?
Yes, you can remove Android apps from your Chromebook. The process is similar to uninstalling regular Chrome apps. Access the app launcher, find the Android app you wish to delete, right-click on its icon, and select "Uninstall." Confirm the deletion, and the Android app will be removed from your Chromebook.
How to delete extensions on Chromebook?
Deleting extensions from the Chrome browser on your Chromebook is straightforward. Click on the three-dot menu in the top-right corner of the Chrome browser, then navigate to "More tools" and select "Extensions." Find the extension you want to delete and click on the "Remove" button next to it. Confirm the removal and the extension will be deleted from your Chromebook.
What happens to app data when I delete an app on Chromebook?
When you delete an app on Chromebook, its data and settings are typically removed as well. This means any data associated with the app, such as files, documents, or user preferences, will be permanently deleted. It is essential to back up any important data before proceeding with app deletion to avoid data loss.
How to delete pre-installed apps on Chromebook?
Chromebooks come with some pre-installed apps. While you cannot completely uninstall these system apps, you can remove them from the app launcher. To do this, right-click on the app's icon and select "Unpin" from the context menu. The app will no longer appear in the app launcher, but it will still be accessible through the Chrome OS settings.
Can I delete apps from the Chrome Web Store?
No, you cannot directly delete apps from the Chrome Web Store. The Chrome Web Store is an online marketplace where you can find and install new apps. To delete apps from your Chromebook, you need to remove them from your app launcher using the steps mentioned earlier.
How to delete Linux apps on Chromebook?
To delete Linux apps on your Chromebook, open the Chrome OS settings and navigate to "Linux (Beta)." Click on "Develop Android Apps" and then "Manage Linux applications." Find the Linux app you want to delete, click on the three-dot menu next to it, and select "Uninstall." Confirm the deletion, and the Linux app will be removed from your Chromebook.
Can I reinstall deleted apps on Chromebook?
Yes, you can reinstall deleted apps on your Chromebook. If you have previously uninstalled an app and wish to reinstall it, you can go to the Chrome Web Store, search for the app, and install it again. Alternatively, you can access the "My Extensions & Apps" page in the Chrome browser and reinstall apps from the "Recently Uninstalled" section.
How to delete multiple apps at once on Chromebook?
Unfortunately, Chrome OS does not have a built-in feature to delete multiple apps at once. You need to remove apps one by one using the app launcher or Chrome browser settings. To save time, you can organize your apps into folders on the app launcher and delete entire folders if needed.
How to troubleshoot issues when apps won't delete on Chromebook?
If you encounter issues when trying to delete apps on your Chromebook, there are a few troubleshooting steps you can follow. First, try restarting your Chromebook, as this can resolve temporary glitches. If the problem persists, ensure that you have the necessary permissions to delete the app, especially if you are using a managed Chromebook. Clearing your browser's cache and updating Chrome OS to the latest version can also help resolve app deletion issues. If none of these steps work, you may need to contact Chromebook support for further assistance.


