


In our fast-paced digital lives, efficiency and productivity are paramount. One often overlooked yet essential aspect of optimizing your Mac experience is adjusting the screen timeout. Screen timeout refers to the duration of inactivity before your Mac’s display dims or goes to sleep. While the default settings are designed to balance power consumption and user convenience, customizing the screen timeout can significantly enhance your workflow and save energy.
As a tech enthusiast, I understand the value of streamlining your digital workspace. The purpose of this blog is to guide you through the process of changing the screen timeout on your Mac, empowering you to take control of your display settings and elevate your productivity. Whether you’re a seasoned Mac user or a newcomer to the macOS ecosystem, this comprehensive guide will equip you with the knowledge to tailor the screen timeout to your preferences.
Before diving into the details of customization, let’s take a moment to grasp the concept of screen timeout. When you leave your Mac idle for a certain period, the screen timeout triggers, dimming or turning off the display to conserve power. This feature is particularly useful for laptops and desktops alike, as it not only extends battery life but also prevents unnecessary screen burn-in.
The default screen timeout settings on macOS are carefully calibrated to provide a balance between power-saving and user convenience. However, every individual’s workflow and preferences are unique. Therefore, understanding how to change the screen timeout allows you to tailor your Mac experience precisely as you desire, saving energy and enhancing productivity in the process. Now, let’s embark on the journey of mastering your Mac’s screen timeout settings!
Changing Screen Timeout on Mac
To begin customizing your Mac’s screen timeout, follow these simple steps:
- Click on the Apple menu: Locate the Apple logo at the top-left corner of your screen, and click on it to open the drop-down menu.
- Go to “System Preferences”: From the drop-down menu, select “System Preferences.” This will open a new window with various system settings options.
- Access “Energy Saver”: Within the System Preferences window, click on the “Energy Saver” icon. This section is where you can manage your Mac’s power and screen-related settings.
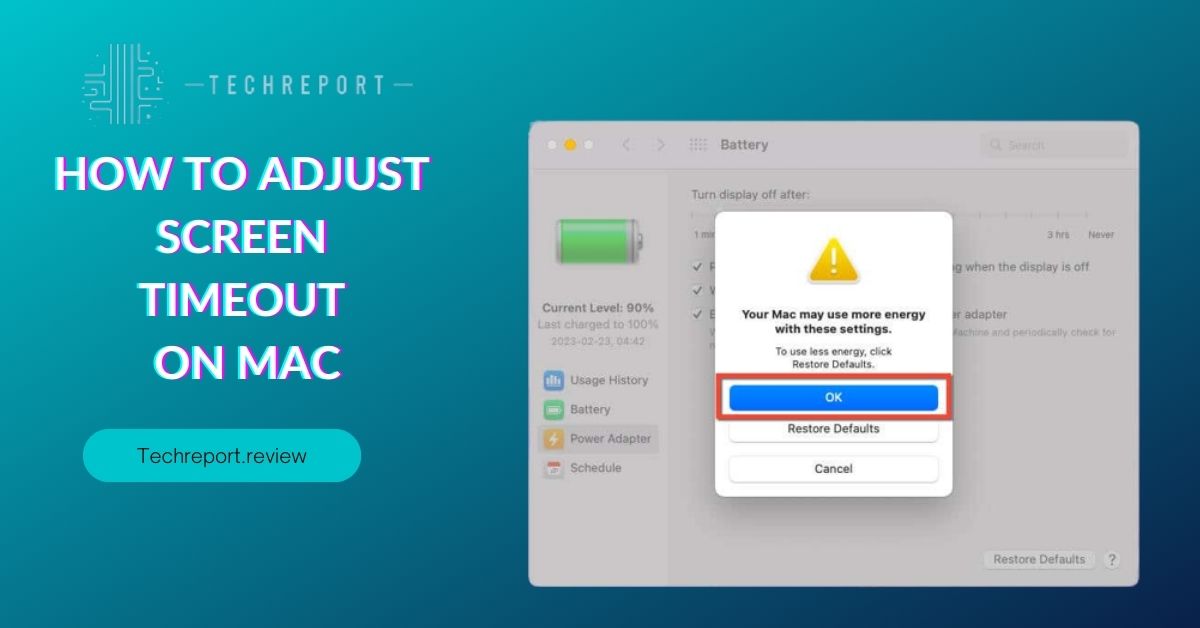
- Adjust “Turn display off after”: In the Energy Saver window, you’ll find the option labeled “Turn display off after.” This is the screen timeout setting that determines how long your Mac’s display stays on when idle. You can adjust the slider to your preferred duration.
- Save changes: Once you’ve set your desired screen timeout duration, close the Energy Saver window. Your changes will be automatically saved, and your Mac will now use the new screen timeout setting.
By default, macOS is configured to dim the display after a few minutes of inactivity to conserve power. The default screen timeout setting is typically set to around 10 minutes. This time period is a general compromise to cater to most users, ensuring that the screen doesn’t stay on indefinitely when not in use, leading to unnecessary power consumption and potential screen burn-in.
While the default screen timeout works well for many users, you may find that your workflow or preferences demand a different duration. For instance, if you work with long documents or engage in activities that involve infrequent screen interactions, you might want to extend the timeout to avoid interruptions. On the other hand, if you’re concerned about conserving energy and extending battery life on a MacBook, setting a shorter timeout could be more suitable.
To set a custom screen timeout duration, follow the steps mentioned earlier in section A. By adjusting the “Turn display off after” slider, you can set the screen to dim or turn off after a time period that aligns perfectly with your usage patterns. With this customization, your Mac’s display management will complement your work style, allowing you to maximize productivity and efficiency while minimizing energy usage.
Finding Screen Timeout Settings on Mac
The process of finding the screen timeout settings may vary slightly depending on the macOS version you are using. Here’s how to access it on different versions:
macOS Catalina and Earlier:
- Click on the Apple menu in the top-left corner.
- Select “System Preferences” from the drop-down menu.
- Click on “Energy Saver” to access the screen timeout settings.
macOS Big Sur and Later:
- Click on the Apple menu in the top-left corner.
- Select “System Preferences” from the drop-down menu.
- Choose “Display & Brightness” or “Displays.”
- Look for an option related to screen timeout or sleep settings.
In addition to the basic screen timeout settings, macOS offers some advanced display options to further customize your experience. These advanced settings are useful for fine-tuning your screen behavior:
- Display Sleep: This setting determines how long your Mac’s display remains inactive before it goes to sleep. You can adjust the timing to ensure the display sleeps quickly when not in use, conserving power.
- Screen Saver: While not directly related to screen timeout, the screen saver settings allow you to set a specific time after which a visually pleasing animation or image will appear on your screen when it’s idle.
- Wake for Wi-Fi Network Access: Enabling this option allows your Mac to wake from sleep mode when it detects network activity, such as incoming messages or updates.
- Power Nap: Power Nap is a feature on some Mac models that allows them to perform certain tasks, such as updates and iCloud syncing, even when asleep.
Changing the screen timeout on your Mac can have a significant impact on power-saving features and battery consumption. By reducing the screen timeout duration, you can effectively save energy and extend your MacBook’s battery life. When the screen turns off or goes to sleep sooner, the Mac draws less power, resulting in improved battery efficiency.
For MacBook users, customizing the screen timeout duration becomes even more critical as it directly affects battery performance when using the laptop on the go. A shorter screen timeout can help preserve battery life during periods of inactivity, making it an essential adjustment for users who rely heavily on their MacBook’s battery power.
By understanding how screen timeout settings work and how they interact with power-saving features, users can optimize their Mac’s energy consumption while ensuring an optimal balance between performance and battery life.
Preventing Mac Screen from Sleeping
There are instances when you may need to keep your Mac screen awake for extended periods, such as during presentations, watching videos, or while working on a project. Fortunately, macOS offers various options to prevent your screen from going to sleep automatically.
Adjusting Screen Timeout Settings:
- Go to “System Preferences” from the Apple menu.
- Select “Energy Saver” (or “Display & Brightness” on macOS Big Sur and later).
- Drag the “Turn display off after” slider to the far right to set a longer duration before the screen goes to sleep.
- Keep in mind that this method affects the overall sleep settings for your Mac, so remember to adjust it back to your preferred duration once you’re done with the specific task.
Using Third-Party Apps:
- Some third-party apps, like Amphetamine or Caffeine, offer additional features to keep your Mac awake. These apps provide menu bar icons that allow you to enable or disable screen sleep with a single click.
Activity Monitor:
- If you want to keep your Mac awake while specific applications are running, you can use the Activity Monitor.
- Open “Applications” > “Utilities” > “Activity Monitor.”
- Find the application you want to keep your Mac awake for and select it.
- Click on the “Insomnia” button in the toolbar to prevent your Mac from sleeping while that app is running.
For specific tasks like presentations, watching videos, or media playback, macOS offers “Prevent computer from sleeping automatically when the display is off.” This option is particularly useful when you need to ensure that your Mac doesn’t go to sleep during specific activities.
While Watching Videos or Presenting:
- Click on the Apple menu and go to “System Preferences.”
- Select “Energy Saver” (or “Display & Brightness” on macOS Big Sur and later).
- Check the box next to “Prevent computer from sleeping automatically when the display is off.”
- This option will keep your Mac awake even if the display is turned off, ensuring that your videos or presentations are not interrupted.
During Media Playback:
- Some media players, like VLC, have built-in settings to prevent your Mac from sleeping while the media is playing.
- Open your media player and go to the playback settings.
- Look for an option related to sleep prevention or screen timeout, and enable it.
By utilizing these methods and adjusting the screen timeout settings accordingly, you can ensure that your Mac’s screen stays awake during critical tasks and activities, providing a seamless and uninterrupted experience. Remember to revert the settings to your preferred screen timeout duration when you’re done to conserve energy and maximize battery life.
Customizing Screen Timeout for Applications
As a Mac user, you have the flexibility to customize the screen timeout settings for individual applications, allowing you to have fine-grained control over how your Mac behaves during specific tasks. This feature is especially useful when you want to manage the screen timeout differently based on the nature of the application you are using.
Utilizing “caffeinate” Command in Terminal:
- macOS provides a built-in command-line utility called “caffeinate” that allows you to keep your Mac awake while running specific applications.
- Launch “Terminal” from “Applications” > “Utilities.”
- Type “caffeinate” followed by the application’s path. For example:
caffeinate /Applications/Google\ Chrome.app - This will prevent your Mac from sleeping while Google Chrome is running.
Third-Party Apps:
- Some third-party apps offer more intuitive ways to manage application-specific screen timeout settings.
- Amphetamine is one such app that provides a user-friendly interface to create custom profiles for different applications.
- You can configure the app to keep your Mac awake while specific apps are running, and it will automatically handle the screen timeout settings for you.
Customizing the screen timeout for individual applications brings several advantages that enhance your overall user experience:
Optimal Power Management:
By adjusting the screen timeout for applications like video players or media editing software, you can ensure that your Mac’s display stays active when it’s needed and conserves power when it’s not in use.
Enhanced Productivity:
Application-specific screen timeout settings can boost productivity by preventing distractions caused by the screen going to sleep during important tasks. For example, you can set a longer screen timeout duration for text editors or coding software to focus on writing or coding without interruptions.
Seamless Presentations:
When giving presentations, you can set the screen timeout to a longer duration to ensure that your Mac’s display doesn’t turn off while you’re presenting. This way, you can deliver a smooth and uninterrupted presentation without worrying about screen dimming.
Improved Multitasking:
With different applications having their screen timeout settings, you can effectively multitask without worrying about your Mac going to sleep at inopportune times. For instance, you can keep a web browser open with a long timeout for research purposes while simultaneously using productivity tools with shorter timeouts.
Customizing the screen timeout for specific applications offers a personalized and efficient
experience tailored to your workflow. By utilizing built-in features like “caffeinate” or third-party apps like Amphetamine, you can easily manage application-specific screen timeout settings and make the most out of your Mac’s display management capabilities.
Impact on Battery Life
Screen timeout settings play a crucial role in determining the battery life and power consumption of your Mac. When your Mac’s display remains active for extended periods, it consumes more power, which can result in quicker battery drain. On the other hand, setting a shorter screen timeout duration conserves power by turning off the display when not in use.
Longer Screen Timeout:
If you set a longer screen timeout, the display will stay active for a prolonged period even when you’re not actively using your Mac. This can lead to increased battery consumption, especially if your Mac remains idle or if you forget to manually turn off the screen.
Shorter Screen Timeout:
Choosing a shorter screen timeout duration ensures that your Mac’s display turns off more quickly when idle. As a result, your Mac conserves battery power during periods of inactivity, ultimately extending the battery life.
Aside from adjusting the screen timeout settings, you can implement additional tips to optimize battery performance on your Mac:
Dim the Display Brightness:
Lowering the display brightness can significantly impact battery life. Adjust the brightness to a level that is comfortable for your usage while conserving power.
Manage Background Apps:
Some applications may run in the background and consume power even when you’re not actively using them. Check your Activity Monitor (found in “Applications” > “Utilities”) to identify resource-intensive background processes and close unnecessary apps.
Enable Energy Saver Settings:
macOS offers built-in energy saver settings that can further extend battery life. Go to “System Preferences” > “Energy Saver” to customize options such as putting the display to sleep and enabling “Power Nap.”
Disable Bluetooth and Wi-Fi When Not Needed:
Bluetooth and Wi-Fi can be significant power consumers. Turn off these features when you’re not using them, especially if you’re working offline.
Keep Your Mac Updated:
macOS updates often include optimizations and improvements that can enhance battery performance. Ensure that your Mac is running the latest macOS version.
Close Unused Apps:
Closing applications you’re not using prevents them from consuming system resources and battery power in the background.
By implementing these battery-saving practices and setting an appropriate screen timeout duration, you can maximize your Mac’s battery life and get the most out of your device while on the go. Tailoring your screen timeout settings to suit your usage patterns and complementing them with other battery-saving habits ensures an efficient and long-lasting battery performance on your Mac.
In Crux
In conclusion, customizing the screen timeout on your Mac is a simple yet powerful way to enhance your overall user experience. By adjusting the screen timeout settings to your liking, you can strike a perfect balance between power-saving efficiency and personal convenience. The ability to set the duration of inactivity before the screen turns off allows you to tailor your Mac’s behavior to suit your unique needs and usage patterns.
Throughout this guide, we’ve explored the step-by-step process of changing screen timeout settings on various macOS versions, understanding the impact on battery life, and optimizing your Mac’s display behavior. Armed with this knowledge, you now have the power to take full control of your Mac’s screen and ensure it aligns perfectly with your preferences and lifestyle.
The key takeaway from this guide is that finding the perfect screen timeout duration involves striking a balance between energy conservation and usability. A shorter screen timeout conserves battery power and reduces unnecessary energy consumption during periods of inactivity. However, setting an excessively short timeout may inconvenience you if the screen turns off too quickly while you’re working. On the other hand, a longer timeout may be suitable for specific tasks, like presentations or watching videos, where you want the display to stay active.
By customizing your screen timeout settings based on your workflow and preferences, you can create an optimized environment that maximizes both productivity and battery life. Remember to adjust your screen timeout duration as needed, considering the type of tasks you’re performing and whether you’re running on battery or connected to a power source.
In conclusion, changing screen timeout settings on your Mac is a simple yet effective way to tailor your device to your unique needs. By personalizing your Mac’s display behavior, you can optimize battery performance, reduce power consumption, and enjoy an enhanced user experience that perfectly complements your workflow. Embrace the power of customization and make the most of your Mac’s capabilities to elevate your productivity and enjoyment while using this versatile device.
How much did you like our detailed Stay Awake and Productive: How to Adjust Screen Timeout on Mac. Please share these Blogs with your friends on social media.
Related Blogs
- Is iPhone 14 Worth the Hype
- iPhone 15 Pro
- Apple CarPlay
- Apple Watch
- iPhone 6 vs Nexus 6
- Apple Vision Pro
FAQs about Adjust Screen Timeout on Mac
Can I set a custom screen timeout duration on my Mac?
Yes, you can set a custom screen timeout duration on your Mac by adjusting the "Turn display off after" slider in the Energy Saver preferences.
What happens to my data when I delete my Google Voice account?
When you delete your Google Voice account, your call history, voicemail, and text messages will be permanently deleted and cannot be recovered.
How can I prevent my Mac screen from going to sleep?
To prevent your Mac screen from going to sleep, you can go to "System Preferences," choose "Energy Saver," and uncheck the "Put hard disks to sleep when possible" option.
Can I change the screen timeout for specific applications on Mac?
No, macOS does not provide native options to change screen timeout for specific applications. The screen timeout settings apply globally to the entire system.
Are there third-party apps to customize the screen timeout on Mac?
Yes, some third-party apps allow more granular control over screen timeout settings, offering options to customize timers for individual applications.
How to set different screen timeout settings for the battery and power adapter on Mac?
macOS does not offer a built-in feature to set different screen timeout settings for battery and power adapter separately.
Can I disable the screen timeout feature on my Mac?
No, macOS does not provide an option to completely disable the screen timeout feature. The closest option is to set the timeout to its maximum value.
Will changing my screen timeout affect battery life?
Yes, setting a shorter screen timeout can help conserve battery life by reducing the time the screen stays active during inactivity.
How to adjust the screen timeout for macOS Big Sur and later versions?
For macOS Big Sur and later, you can access screen timeout settings by going to "System Preferences," selecting "Display & Sleep," and adjusting the "Turn display off after" slider.


